Updated 2026-10-29 for Codex CLI 0.165.0: GPT-6.1 Terra is in the model list; supported models can change reasoning effort mid-conversation by default; fresh profiles use memory v2; the session picker can filter by repository; a missing model now fails right away instead of retrying. The beginner walkthrough below keeps our 0.163.0 test results.
The short version: To use Codex, you only need to remember one small loop: launch it in the right directory → /status to confirm the model and permissions → give it a small, clearly scoped task → review the diff and run tests → decide whether to keep or roll back. The most useful change for beginners in the October 2026 release is that you can send a new message while Codex is working to steer it, instead of waiting for it to finish.
We ran every step below with Codex CLI 0.163.0 and gpt-6.1-sol. We changed the requirement 3 seconds into a reply, and Codex made the change to the new spec and got the tests passing. The whole run took 49 seconds. A side question with /side took 8 seconds for one question and answer, without interrupting the main task.
Cheat Sheet
| What you want to do | Command or action | Notes |
|---|---|---|
| Check version / upgrade | codex --version / npm install -g @openai/codex@latest | This article is based on 0.163.0 |
| Confirm model, provider, and permissions | /status | Check here first whenever behavior looks wrong |
| Change permissions | /permissions | Beginners should stay on Ask for approval |
| Switch model and reasoning effort | /model | Pick the model first, then the effort level |
| Change requirements mid-task | Type a new message and press Enter | On by default in 0.163.0 |
| Search and change settings | /config, press / to search | Changes are saved automatically |
| View and change keyboard shortcuts | /keymap | The leader key defaults to Ctrl+X |
| Ask a question without interrupting the main task | /side | Ctrl+/ switches between the main conversation and the side conversation |
| Copy a specific piece of output | /copy | For selected text, use Ctrl+Insert |
| Work in a separate worktree | /worktree or codex --worktree | Doesn't affect your main directory |
| Rewind to an earlier message | Press Esc twice with an empty input box | Rewinds the conversation only, not the code |
Step 1: Check your version and upgrade if needed
codex --version
This article is updated for 0.165.0 (the beginner walkthrough was tested on 0.163.0). If you are below 0.165.0, upgrade first:
npm install -g @openai/codex@latest
If you haven't installed Codex yet, start with the Codex installation guide.
Since 0.161.0, Codex's built-in model list defaults to GPT-6.1 Sol (gpt-6.1-sol). The official changelog also states that starting October 14, 2026, Codex sessions signed in with a ChatGPT account can no longer use GPT-5.5. Sessions authenticated with an API key are not affected. If yourconfig.toml, profiles, scripts, or scheduled jobs still referencegpt-5.5, we recommend changing them all togpt-6.1-sol.
What changed in Codex 0.165
According to the OpenAI Codex 0.165.0 release notes, these are the changes that matter to new users. We installed 0.165.0 on a clean machine with a temporary HOME and tried each one.
Check your version and upgrade to 0.165
codex --version
npm install -g @openai/codex@0.165.0
The npm install took about 5 seconds, and codex --version then showed codex-cli 0.165.0.
Pick GPT-6.1 Terra with an AICodeWith API Key
0.165.0 adds GPT-6.1 Terra to the model list. We tested gpt-6.1-terra with an AICodeWith API Key and it responded normally. Set the model in your config:
model = "gpt-6.1-terra"
Or pick it for one run only: codex -m gpt-6.1-terra. A short reply through codex exec -m gpt-6.1-terra took about 40 seconds. For what Terra is for and more tests, see How to use GPT-6.1 Terra in Codex.
Change reasoning effort mid-conversation
From 0.165.0, supported models can change reasoning effort inside the same conversation by default, with no new session. In the TUI, type /model, keep the same model and choose another effort level; later replies use the new level and the earlier context stays. In non-interactive mode you can switch levels while resuming the last session:
codex exec -c model_reasoning_effort=low "Make divide in calc.py return None when b is 0"
codex exec -c model_reasoning_effort=high resume --last "Now add a one-line docstring to divide"
Our test (gpt-6.1-sol): the low-effort fix took about 66 seconds; the second step switched to high in the same session (the log showed reasoning effort: high and the same session id) and adding the docstring took about 87 seconds. For choosing levels and using presets, see Codex 0.164 reasoning presets.
memory v2: what it is and how to switch it
Memories save key points from past sessions so later sessions can use them. From 0.165.0, fresh profiles store them with memory v2. In our fresh HOME, codex features list showed memories off by default. Turn it on or off with these commands (about 0.1 seconds; they write to [features] in config.toml):
codex features enable memories
codex features disable memories
According to the release notes, memory v2 can also import memories from other agents; in 0.165.0 the matching flag external_agent_memory_import is still marked under development and off by default, so there is no rush. Project rules are still more reliable in AGENTS.md.
Filter sessions by repository
According to the release notes, the session picker opened by codex resume now has a repository filter, which helps when you work across several worktrees.
A missing model now fails right away
0.165.0 no longer retries when the provider says a model does not exist; it shows the error message instead. We used a made-up model name on purpose and Codex exited with the message after 0.3 seconds. If you see this, check the spelling of model against the config.toml guide.
Step 2: Sign up and create an API key
- Sign up and log in at AICodeWith
- In the left sidebar, click "Key Management", then click "Create Key" in the upper right and give it a name you'll recognize
- Copy and save it right after it's generated. Once you close this window, you can no longer see the full key
Step 3: Write the global config at ~/.codex/config.toml
Open ~/.codex/config.toml (on Windows, C:\Users\你的用户名\.codex\config.toml) and add the following:
model_provider = "aicodewith"
model = "gpt-6.1-sol"

[model_providers.aicodewith]
name = "aicodewith"
base_url = "https://api.aicodewith.ai/chatgpt/v1"
wire_api = "responses"
experimental_bearer_token = "sk-你的Key"
Putting this in the global config applies it to every project, so you don't have to set it up each time you open a terminal. For what each setting means, see the Codex config.toml configuration guide. For fuller setup and verification steps, see Connecting Codex to AICodeWith. For the differences between other authentication methods, see How to configure a Codex API key.
Step 4: Launch and confirm the model, permissions, and authentication
Go to the project root before launching. Codex reads and writes files around the current directory:
cd 你的项目目录
git status
codex
The first time you launch in a directory, it asks whether you trust the folder. Choose Trust and continue only if it's your own project.
/status: confirm the model and provider
Once inside, type /status first. These are the key lines we saw in testing:
Model:               GPT-6.1-Sol (reasoning low)
Model provider:      aicodewith
Directory:           /你的项目目录
Permissions:         Workspace (Ask for approval)
Model provider shows aicodewith, which means your config took effect.
If you useexperimental_bearer_token, runningcodex login statusin the terminal shows Not logged in. That's what we saw with this setup in testing, and Codex works normally anyway. To decide whether it's usable, go by the provider in/statusand whether a message gets a normal reply.
/permissions: don't open things up too much at first
/permissions has four levels:
| Option | Meaning |
|---|---|
| Ask for approval (default) | Can read and write files in the project and run commands. Network access or changes to files outside the project need your confirmation |
| Approve for me | Only asks you about operations judged potentially unsafe |
| Full Access | Can modify files outside the project and access the network without asking. Use with caution |
| Read Only | Read-only. Editing files or accessing the network requires confirmation |
Beginners should stay on the default, Ask for approval. In our testing, at this level the .git directory is read-only for Codex. When it needs to create a branch, a prompt asks you to confirm, which is exactly the moment you want to take a look.
/model: choose the model and reasoning effort
/model lets you pick the model first, then the reasoning effort (Low, Medium, High, Extra high, and so on). With an API key, GPT-5.5 still appears in the list, but we recommend GPT-6.1 Sol for new tasks. The default Low is fast enough for everyday code changes. Raise it for refactors across many files or hard-to-find bugs.
Step 5: Do a small task and practice interjecting, /side, and /copy
The test repo has a calc.py where divide(a, b) doesn't handle division by zero.
Course-correcting mid-reply
Send this first:
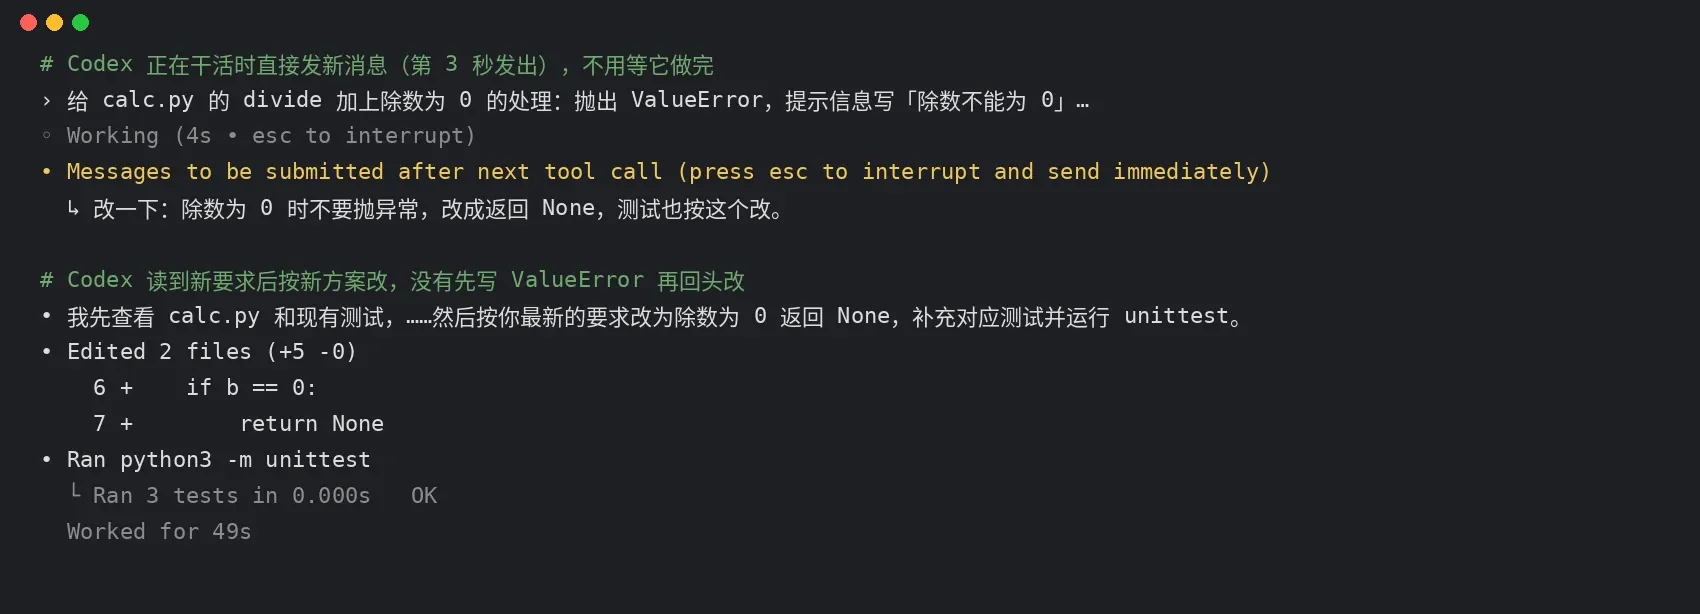
给 calc.py 的 divide 加上除数为 0 的处理:抛出 ValueError,提示信息写「除数不能为 0」,并在 test_calc.py 里补测试,最后运行 python3 -m unittest。
Three seconds after Codex started working, we changed our minds and sent this straight into the input box:
改一下:除数为 0 时不要抛异常,改成返回 None,测试也按这个改。
codex-steer-mid-reply
The interface says the message will be delivered after the next tool call. To make it take effect immediately, press Esc to interrupt and send right away. In testing, Codex read it and went straight to the new requirement. It didn't write a ValueError version first and then go back to change it. All 3 tests passed, and the whole run took 49 seconds.
The official changelog says that from 0.163.0 on, you can send a new message during a reply to steer it. It's on by default and needs no extra configuration.
/side: ask a question without interrupting the main task
If you want to ask something related without writing it into the main conversation, type /side to open a side conversation. We asked "What are the pros and cons of returning None versus raising ValueError?" It gave a two-sentence comparison in 8 seconds and didn't change any files.
Ctrl+/switches between the main conversation and the side conversation- After switching back to the main conversation, typing
/sideagain returns you to the same side conversation, and the earlier Q&A is still there (behavior fixed in 0.163.0) - Q&A in the side conversation doesn't show up in the main conversation
/copy: copy a specific piece of output
After typing /copy, use ↑ ↓ to pick the block to copy, such as "the whole reply" or "the message you sent", then press Enter. The interface tells you how many characters were copied. To copy a piece of selected text on screen, use Ctrl+Insert.
/config and /keymap: Changing Settings and Keybindings
/configis paginated by category (Appearance, Notifications, Input, Sessions, Text Selection). Press/to search directly. For example, search forvimto find "Start in Vim mode". Changes are saved automatically. According to the official docs, most settings take effect immediately, and any that require a restart are flagged separately./keymaplists every configurable shortcut, and you can search and rebind them. The Leader key defaults toCtrl+X, copy isCtrl+O, toggling a side conversation isCtrl+/, and voice mute has moved toF9
/worktree: Try a Different Approach in a Separate Directory
Starting with 0.162.0, Codex-managed git worktrees are supported. Type /worktree to choose whether to bring the current conversation into a new worktree, start a new conversation in a new worktree, or browse existing worktrees. You can also do it directly from the command line:
codex --worktree
We ran it with codex exec --worktree. It took 20 seconds, and Codex created a separate checkout under ~/.codex/worktrees/, leaving the main directory untouched. Afterward, you can see it under "Browse worktrees" in /worktree. This feature requires the worktrees feature to be enabled. You can check with codex features list. In our 0.163.0 install, it's on by default.
Starting with 0.161.0, you can also use /mcp login <名字> within a session to log in to MCP servers that require authorization, without leaving the terminal.Step 6: Review the Diff, Run Tests, and Decide Whether to Keep or Roll Back
A task being marked "done" doesn't mean the result is correct. Start by looking at what changed:
git diff --stat
git diff
Then run the project's own tests. Here, that's:
python3 -m unittest
If you're happy with it, commit a checkpoint:
git add -A
git commit -m "divide: 除数为 0 返回 None"
If you're not, revert only the files changed in this run. Don't reach for a reset of the whole workspace right away:
git restore calc.py test_calc.py
In the Codex desktop app, you can edit messages you've already sent. In the CLI, pressing Esc twice on an empty input box rolls back to an earlier message so you can revise it. But a CLI rollback only rewinds the conversation, not the code. Files that have already been changed need to be handled with git. For details, see How to Edit Previous Messages in Codex.
FAQ
What should I have Codex do the first time I use it?
Start with a read-only or very small task, such as "Give me an overview of this project's structure" or "Check whether the startup commands in the README match package.json, but don't change anything yet." Once you've confirmed it read the right places, let it change code. A good task spells out four things: the goal, the scope, the constraints, and how to verify the result.
What's the difference between interjecting and pressing Esc?
If you just send a new message, Codex picks it up after the next tool call and adjusts, but it finishes the step it's already working on first. Pressing Esc interrupts the current turn immediately, and then you send your new message. For small tweaks, just send the message. If the direction is completely wrong, press Esc.
What should I do about 401, 429, and 503 errors?
401 Unauthorized: the key is wrong or the configuration didn't take effect. See How to fix Codex 401 errors429 Too Many Requests: see How to fix Codex 429 errorsSelected model is at capacity: see What to do when the Codex model is at capacity- Model not found: from 0.165.0 Codex reports the error right away instead of retrying; check the
modelname, see the config.toml guide
How do I check my quota and usage?
For how usage is calculated and why it drops so fast, see Codex usage explained.
How do I make Codex remember project rules?
Run this in Codex: /init, generate AGENTS.md, and put your project commands, code conventions, and verification steps in it. Every new session will read it from then on.
Can I pick up where my last session left off?
Yes. Run codex resume to open the session list and choose one to continue.
Can Claude Code and Codex work together?
Yes. For example, you can have one write the plan and the other review it. See How to Use Claude Code and Codex Together.
Sign up now and start writing code with Codex →